
 En el foro de Xlinesoft apareció una consulta de cómo incluir una cuenta regresiva de una fecha fijada y si buscas en internet hay muchas soluciones del tipo «plugin JavaScript» que son muy fáciles de incluir en un proyecto de PHPRunner.
En este caso he utilizado el plugin Flip Countdown https://github.com/pqina/flip . En esta página explica su funcionamiento y dispone de múltiples ejemplos de cómo incluir este plugin en páginas HTML.
Objetivo
Incluir el plugin JavaScript Flip Countdown en un proyecto PHPRunner como un Snippet.
Facilitar un método para incluir cualquier plugin JavaScript en un proyecto PHPRunner
DEMO: https://fhumanes.com/countDown
Solución Técnica
El aplicativo dispone del siguiente interfaz:
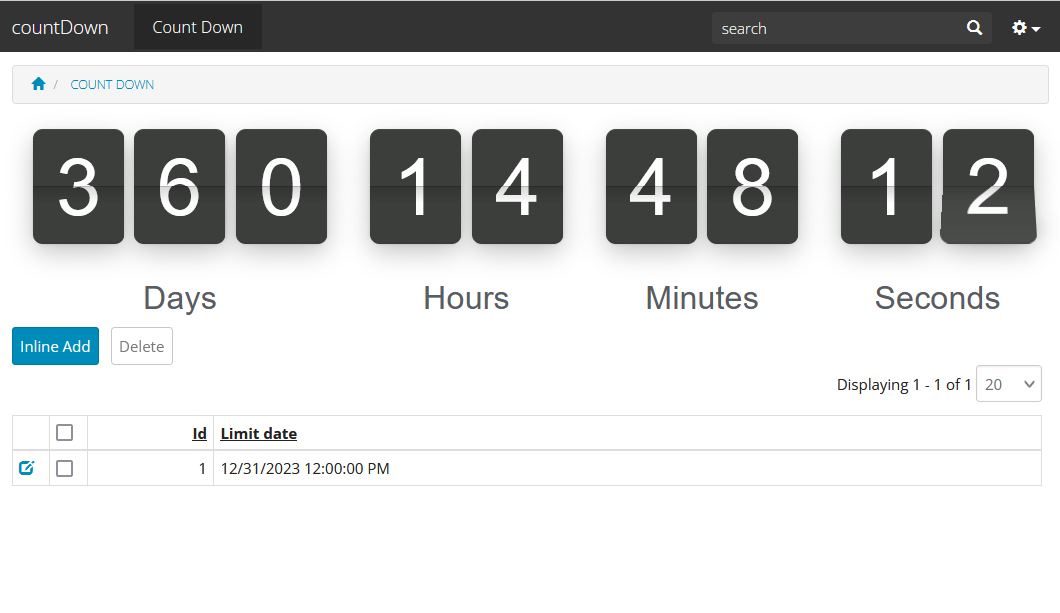 La fecha que va a tomar cómo límite es la fecha del último registro introducido en la tabla.
El código de Snippet es:
$limitDate = now();						// Default date, not record in table
$rs = DB::Query("SELECT date1 FROM countDown order by id desc");
$data = $rs->fetchAssoc();
if ($data <> NULL) {
    $limitDate = $data['date1']; // Recover the last date inserted in the table
}

$html =<<<EOT
<link href="https://unpkg.com/@pqina/flip/dist/flip.min.css" rel="stylesheet">
<script src="https://unpkg.com/@pqina/flip/dist/flip.min.js"></script>
<style>
.tick {
  font-size:1rem; white-space:nowrap; font-family:arial,sans-serif;
}
.tick-flip,.tick-text-inline {
  font-size:2.5em;
}
.tick-label {
  margin-top:1em;font-size:1em;
}
.tick-char {
  width:1.5em;
}
.tick-text-inline {
  display:inline-block;text-align:center;min-width:1em;
}
.tick-text-inline+.tick-text-inline {
  margin-left:-.325em;
}
.tick-group {
  margin:0 .5em;text-align:center;
}
body {
   background-color: #fff !important;
}
.tick-text-inline {
   color: #595d63 !important;
}
.tick-label {
   color: #595d63 !important;
}
.tick-flip-panel {
   color: #fff !important;
}
.tick-flip {
   font-family: !important;
}
.tick-flip-panel-text-wrapper {
   line-height: 1.45 !important;
}
.tick-flip-panel {
   background-color: #3c3e3c !important;
}
.tick-flip {
   border-radius:0.12em !important;
}
</style>
<div class="tick" data-did-init="handleTickInit">
    <div data-repeat="true" data-layout="horizontal fit" data-transform="preset(d, h, m, s) -> delay">
        <div class="tick-group">
            <div data-key="value" data-repeat="true" data-transform="pad(00) -> split -> delay">
                <span data-view="flip"></span>
            </div>
            <span data-key="label" data-view="text" class="tick-label"></span>
        </div>
    </div>
</div>
<script>
    function handleTickInit(tick) {
        // uncomment to set labels to different language
        /*
        var locale = {
            YEAR_PLURAL: 'Jaren',
            YEAR_SINGULAR: 'Jaar',
            MONTH_PLURAL: 'Maanden',
            MONTH_SINGULAR: 'Maand',
            WEEK_PLURAL: 'Weken',
            WEEK_SINGULAR: 'Week',
            DAY_PLURAL: 'Dagen',
            DAY_SINGULAR: 'Dag',
            HOUR_PLURAL: 'Uren',
            HOUR_SINGULAR: 'Uur',
            MINUTE_PLURAL: 'Minuten',
            MINUTE_SINGULAR: 'Minuut',
            SECOND_PLURAL: 'Seconden',
            SECOND_SINGULAR: 'Seconde',
            MILLISECOND_PLURAL: 'Milliseconden',
            MILLISECOND_SINGULAR: 'Milliseconde'
        };

        for (var key in locale) {
            if (!locale.hasOwnProperty(key)) { continue; }
            tick.setConstant(key, locale[key]);
        }
        */

        // format of due date is ISO8601
        // https://en.wikipedia.org/wiki/ISO_8601

        // '2018-01-31T12:00:00'        to count down to the 31st of January 2018 at 12 o'clock
        // '2019'                       to count down to 2019
        // '2018-01-15T10:00:00+01:00'  to count down to the 15th of January 2018 at 10 o'clock in timezone GMT+1

        // create the countdown counter
        // var counter = Tick.count.down('2023-12-31T00:00:00+01:00');
         var counter = Tick.count.down('$limitDate');

        counter.onupdate = function(value) {
          tick.value = value;
        };

        counter.onended = function() {
            // redirect, uncomment the next line
            // window.location = 'my-location.html'

            // hide counter, uncomment the next line
            // tick.root.style.display = 'none';

            // show message, uncomment the next line
            // document.querySelector('.tick-onended-message').style.display = '';
        };
    }
</script>

<div class="tick-onended-message" style="display:none">
    <p>Time's up</p>
</div>


EOT;
echo $html;
Cómo podéis ver, los datos del ejemplo los cargo en la variable $html. Antes de hacer la carga del ejemplo en la variable, en código PHP cálculo los valores a sustituir en el ejemplo. En este caso la «fecha límite» $limitDate. Estas variables se indican en los puntos del código copiado, para ajustarlo a la función que yo requiero.
Con este simple sistema, se puede incluir cualquier plugin de JavaScript que exista en internet en nuestros desarrollos PHPRunner.
Para cualquier duda, comunícamela a través de mi email [email protected].
Como siempre, os dejo los fuentes para que podáis instalarlo en vuestros PC’s y hagáis todos los ajustes que necesitéis.
Actualización del 25/02/2023
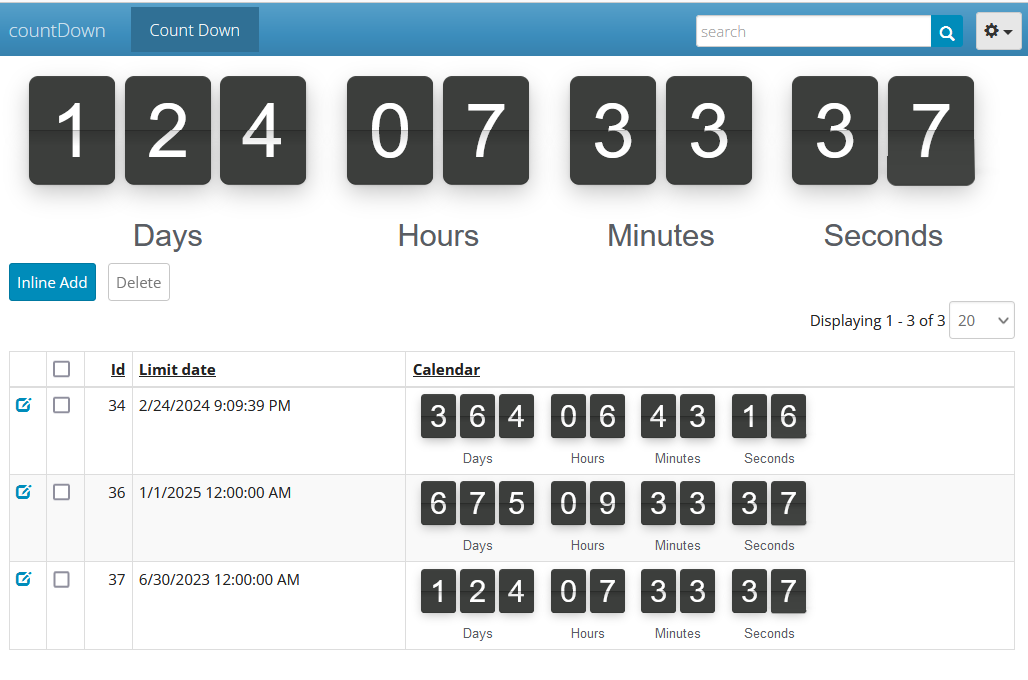 Se ha ampliado el ejemplo para poder mostrar el contador descendente a nivel de registro.
Adjuntos
| Archivo | Tamaño de archivo | Descargas |
|---|---|---|
 PHPRunner 10.7 y Base de Datos
|
33 KB | 343 |
|
PHPRunner 10.7 + Base de datos - Actualización 25/02/2023
|
34 KB | 346 |